Ever wanted to create your own display pictures for MSN Messenger? This tutorial describes how you can turn a (part of) a photo, a drawing, etc. into your own personal display picture to show off to your friends. In order to start turning your picture into a display picture you first need to download a program that makes it possible to edit an exisiting picture, and cut out a square (crop) of an existing picture. A program I use a lot for doing things like this is called IrfanView, which is free for personal use and is quite easy to download and install.
Note: Since Skype uses the same size of display pictures (96 by 96 pixels) you can also use this tutorial to make display pictures for Skype.
Go the the IrfanView website and download the program. Or download it from the Irfan View download page hosted by Tucows.
The file has is named iview###.exe with ### the version number times 100. At the time of writing this was iview397.exe for version 3.97 (size 895488 bytes, MD5SUM a50056f4fc4f451c2daa73508523679d).
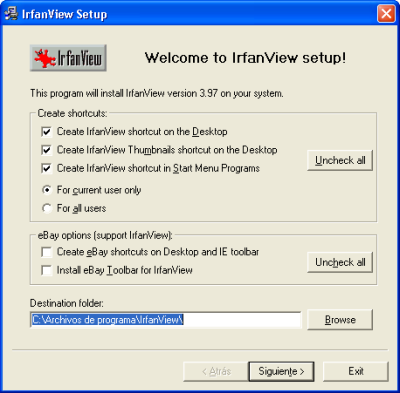
After the download of IrfanView is finished, double click on the file. A welcome screen is displayed by the installation program. If you want to support the development of IrfanView check the eBay options.
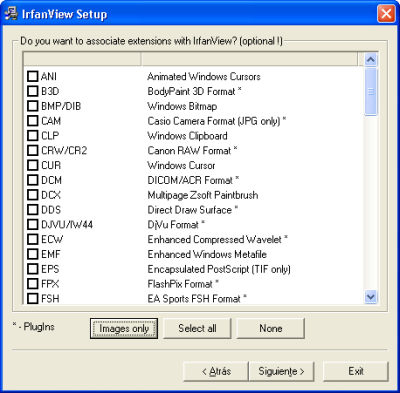
Click the Next button and a short overview: "What's new in this version" appears. After pressing Next again, a window appears that lets you associate image file extensions with IrfanView. For now, I recommend to let this as is, and press next again.
The message "Ready to Install!" appears, and after pressing the Next button again, the installation process starts. If all went well an "Installation successfull" message appears and you can visit the website and start the program. I recommend unchecking visit the website.
Use IrfanView to open the picture you want to use to create a MSN display picture. You can use the Open... option in the File menu (or press the letter O key), drag and drop a picture in the IrfanView window, or even paste an image by pressing Ctrl+V (for example after PrintScrn).
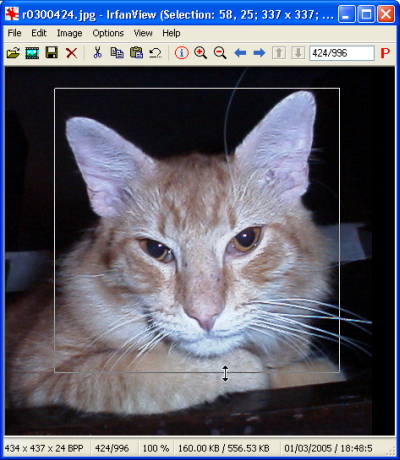
Now press the left mouse button on the image, and while holding the button, draw a selection rectangle. In the window title you can now see the word Selection followed by four numbers. The last two are the width and the height of the selection. It's very important to keep those numbers identical, since a display picture is square shaped. You can drag the edges of the selection with the mouse to get the required area. Just move the mouse over an edge so the mouse cursor changes to a double arrow, press the left mouse button and hold it while you move the mouse. If you have selected the desired area, select Crop Selection in the Edit menu (or press Ctrl+Y).
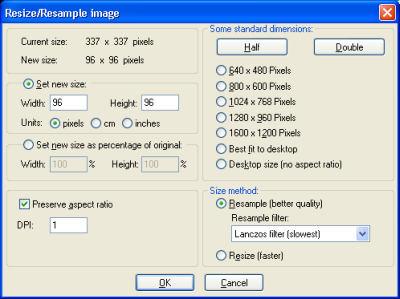
The next step is resizing the image. Although MSN Messenger is able to do the resizing, if you do it yourself you are more in control and might get better results and sharper display pictures. In the Image menu select Resize/Resample... (Ctrl+R). Since the resolution of a display picture for MSN Messenger is 96 by 96 pixels, enter 96 as width. If you kept your selection square shaped, the height should be automatically set to 96.
If this is not the case, and the difference is very small, you might consider turning Preserve aspect ratio off in the same window. However, this will distort your image.
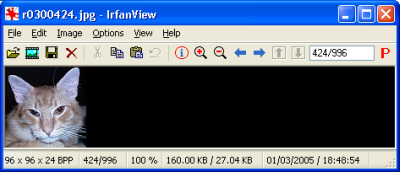
If the resizing process makes the image smaller it will often look less sharp. Try the Sharpen option in the Image menu to change this. If you are not satisfied with the result, select Undo (Ctrl+Z) in the Edit menu. The Enhance Colors... option in the Image menu gives you control over the colors, brightness, contrast, etc. of the picture.
If you are satisfied with the result, select the Save As option in the File menu. Make sure you select a type that is supported by MSN Messenger:
Save the picture in the My Pictures directory if you want to find it back easily when adding it to MSN Messenger.
Open MSN Messenger and select Options... in the Tools menu at the top of the contact list window. Click the Change Picture button in the Options window that appears.
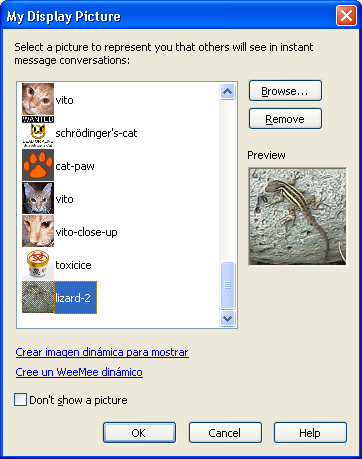
Press the Browse... button in the My Display Picture window that appears. Go to the directory that contains your display picture, and select the picture. Click Open to have Messenger open the file and add it to the list of available pictures. The new picture is automatically turned into your current display image.
Of course you can find plenty of pictures on the Internet. In most cases it's probably ok to modify a picture for your own personal use. But if you want to give the display picture to others, make sure you ask the owner of the original picture first.