
For many years the Perl distribution I've been using as a freelance Perl programmer on Microsoft Windows has been the one made available for free by ActiveState: ActivePerl. This article explains how you can download and install Perl on your own computer running Microsoft Windows XP. ActivePerl is also available for several other operating systems, but I have no experience with running ActivePerl on those. And as the first line somewhat implied, there are other Perl distributions available for Windows. My choice of using ActivePerl is not based on a fair comparison - which distribution is the best for MS Windows - but what has been working for me and my customers for many years.
You can download ActivePerl for free by navigating the ActiveState website to the available binaries for ActivePerl web page.
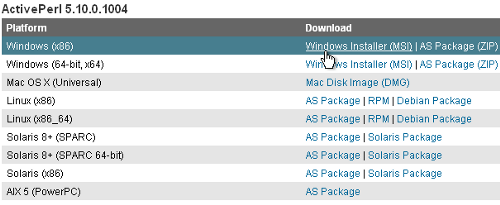
This page shows - at the time of writing - two tables. The top one has download links for ActivePerl 5.10.0.1004, and the bottom one has download links for ActivePerl 5.8.9.825 for various platforms. If you're using a non-64-bit version of Windows XP like me, download the Windows (x86) MSI version. Don't download the AS package unless you know what you're doing. Unless you need Perl version 5.8 for one reason or another, I recommend to download and install ActivePerl 5.10.
In my experience quite some people work daily with Windows XP using an account with Administrator rights for one of the following reasons:
I strongly recommend to not develop software with Administrator rights when not needed (most of the time). Whether you program in Perl or other language, one tiny mistake might delete not only your personal files but also files of people who might share the computer with you, or system files. The latter might result in your computer becoming unstable or no longer working at all.
If you're working with limited rights the damage is limited to your own personal files. So there is still a strong need for making backups often. I furthermore recommend to use a versioning system and will do my best to write in the near future an article on what this is and how you can benefit from it even if you work on your own, and even if you're just starting to program.
As for the limited user rights, you can create a new account via the Control Panel, and set the rights of the new account to Limited in the "Pick an account type" step.
If you're working with limited rights and you need
more rights, you can either switch to an account with
Administrator rights - in most cases you don't need to
log out first - or you can use the Run As option
either via a context menu or at the command line using
the runas command. This command offers as
far as I know similar functionality as the sudo
command found on other operating systems like
GNU/Linux. The use of runas will be
explained below.
After the download of the ActivePerl MSI file (17.1MB)
has finished it needs to be installed. Assuming that
you are logged in with an account that has limited
user rights (you did read the previous section?), you can
use runas to install the MSI file, using the
following syntax:
runas /user:AdminUser "msiexec /i \"FullPath\""Replace AdminUser with an account that has Administrator rights, and replace FullPath with the full path to the ActivePerl MSI file, for example I used:
C:\Documents and Settings\John>runas /user:Cugel "msiexec /i \"C:\Documents and
Settings\John\My Documents\Downloads\web\ActivePerl-5.10.0.1004-MSWin32-x86-2871
88.msi\""
In the above example I am logged in as user "John", with limited user rights. I've configured the web browser I used to download the MSI, Firefox, to download files in to the web sub folder of the Downloads folder, which is located in My Documents. The user Cugel - yes I like to read books written by Jack Vance - is a user with Administrator rights. Note that the above is one long line, which I've wrapped in this example like the command prompt I used did.
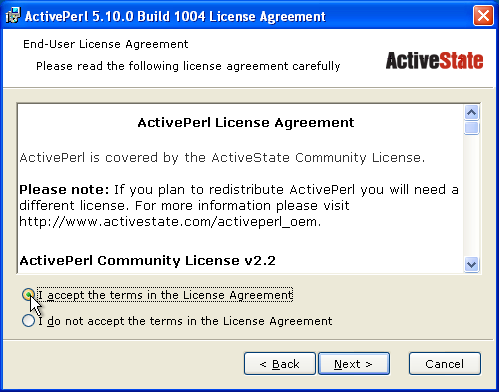
After executing of the command, a dialog window should open, showing a welcome message. Press the Next button at the bottom of this dialog window to move on to step 2 and accept the "ActivePerl Community License".
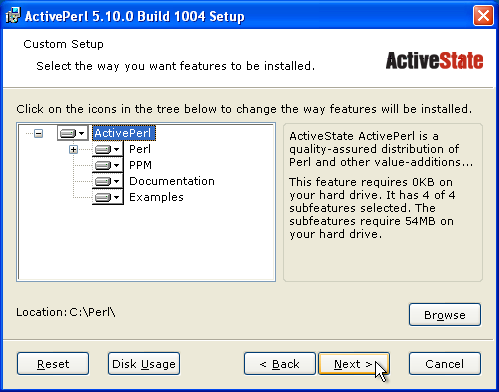
Step 3 allows you to select which ActivePerl features will be installed, and the location of Perl. I recommend to leave everything as is and to click on the Next button at the bottom of the dialog Window.
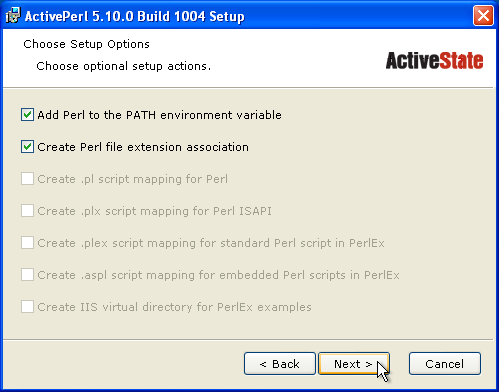
The next step allows you to turn on or off several
setup options. The first option: "Add Perl to the PATH
environment variable", when enabled makes that typing
perl on the command line starts the perl
executable. The second option: "Create Perl file
extension association" makes that entering just the
name of a Perl program - which must have the
pl extension - on the command line starts
the Perl executable with the name of the Perl program
as an argument. Or in short: this makes it possible to
start your Perl program by just typing its
name. Moreover, double clicking on your Perl program
will also run your Perl program via the perl
executable. I recommend to leave those two options in
their default state: enabled.
The next five options are related with using Perl in web development in combination with IIS and can only be changed when you have installed IIS.
After you have changed some options or left all in their default state and pressed the Next button at the bottom of the dialog window, the Setup Wizard is ready to start the actual installation process. Click on the Install button to start the installation of ActivePerl on your computer.
Some time later the Setup Wizard shows the final screen in the installation. If you don't want to read the release notes, click on the checkbox to disable this option. Click on the Finish button to close the Setup Wizard.
The release notes are available as a HTML file, release.html, inside the html
sub folder of the Perl folder. If you installed Perl in the default location,
the full path to this file is: C:\Perl\html\release.html.
For a real test of your ActivePerl installation you
need to run several Perl programs. However, a simple
test to see if the perl excutable has been added to
your PATH environment variable and actually is able to
run is to enter perl -v at the command line.
C:\Documents and Settings\John>perl -v

This is perl, v5.10.0 built for MSWin32-x86-multi-thread
(with 5 registered patches, see perl -V for more detail)

Copyright 1987-2007, Larry Wall

Binary build 1004 [287188] provided by ActiveState http://www.ActiveState.com
Built Sep  3 2008 13:16:37

Perl may be copied only under the terms of either the Artistic License or the
GNU General Public License, which may be found in the Perl 5 source kit.

Complete documentation for Perl, including FAQ lists, should be found on
this system using "man perl" or "perldoc perl".  If you have access to the
Internet, point your browser at http://www.perl.org/, the Perl Home Page.
Note: if you typed perl -v in the command prompt
window you opened earlier on, this will not work because that command prompt
is not aware of the modifications that have been made to the PATH environment variable.
So make sure to open a new command prompt.
If you ever want to report a problem with Perl or need help be sure to include the entire first line reported by perl and the binary build information.
ActivePerl comes with a lot of documentation which can be accessed in two ways and I recommend to familiarize yourself with both.
Will be written in April 2009.
Will be written in April 2008.