If you design websites you might want to install a web server on your computer in order to test your sites in an environment that matches the real thing as close as possible. This article describes how to install and configure the open-source Apache HTTP (web) server and how to make it work with not one site but as many as you require using a technique called name-based virtual hosting.
Planning a good folder structure for organizing your websites is important. Assuming that you have your own company, I recommend to create a "My Company" folder in your "My Documents" folder. Instead of "My Company" you might want to use the real name of your company. Next, create in the "My Company" folder for example the following sub-folders: "Customers" and "My Sites". The latter can be used to store sites that belong to your company.
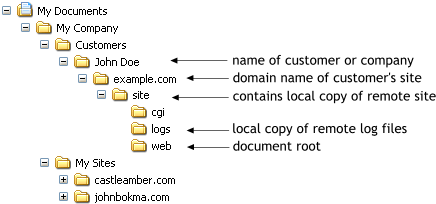
Next, create a folder for each customer under the Customer folder. Use for example the name of the company or the name of the customer to name this folder. Then for each customer create a folder with the same name as the domain of that customer.
Inside each domain folder, create a folder named "site" which will be used to store a local copy of all the folders and files that are also on the (remote) web server connected to the Internet. Try to keep files that shouldn't be on the actual web server outside of this folder in order to use it to update the remote server without too much of a hassle.
For example the site folder I have contains the following folders: cgi, logs, and web. They are named thus because that's the name they have on the server that hosts my website.
The folder named "web" is the document root, in my case, meaning that documents and folders in this folder appear at the top level of the domain. For example, if this folder contains a file "example.html" it will be accessible as http://example.com/example.html assuming that the domain is example.com.
Tip: example.com is a domain name which is reserved for examples (what's in a name). If you need a domain name for an example don't make up your own domain name but always use example.com.
Note that the cgi directory (cgi-bin) is outside the document root folder in the file system, which is a good thing (This will be explained in an upcoming article).
The Apache web server is available in three different series: 1.3, 2.0, and 2.2. Since 2.0 is recommended over 1.3 for running on Windows XP, and software like PHP as far as I know don't support 2.2 yet, I decided to install the latest 2.0.x version which is 2.0.59 at this time of writing.
Go to the
Apache HTTP server download
page and select the series you want to use (either 1.3 or 2.0) and download
the Win32 binary. In my case I downloaded apache_2.0.59-win32-x86-no_ssl.msi.

After you have downloaded the MSI file compare the MD5 signature with the value published on the Apache website. Note: I am working on an explanation on how to do this, for now read the instructions on the Apache HTTP server download page.
If you set up your day-to-day account properly on Windows XP you are working as a limited user. For installation of the Apache HTTP server you need to have Administrator rights. So go to the Windows XP Login screen by pressing the Windows key (between the left Ctrl and left Alt on most keyboards) and the L key together.
When started, the Apache HTTP server installation wizard displays a welcome message. Click on the Next button to continue. Next, the Apache license is shown. Read it carefully and if you accept the license, select the "I accept the terms in the license agreement" option and press the Next button.
Next a "Read This First" document is displayed. Read it carefully before pressing the Next button.
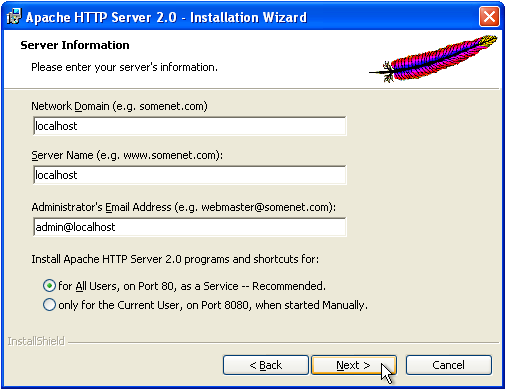
Next, you can enter your server information. Since I don't need other computers on the local network to be able to contact the web server I used localhost. If you have a local network, and want other computers to be able to contact the computer, make sure you use the right settings. If you don't know which option you want, use localhost for now, since you can always change the configuration settings later on in the configuration file of the Apache web server.
I recommend to run the Apache HTTP server as a service. This way it is always running and you don't need to start it manually. If you consider manually start and stop because of security issues, then reconsider and use a firewall, preferable one running on an external device like a router.
The next step allows you to select the install type of the Apache web server. The default (Typical program features) is probably right for your situation, so press Next.
Next, you can select the destination folder of the installation. Unless you prefer to
use a different folder for some or all of the software you install, I recommend to use
the default setting: C:\Program Files\Apache Group\
Finally, after clicking on the Next button you can start the actual installation by pressing the Install button. A few windows pop up and go automatically, and then a Windows Security Alert window appears asking if you want to keep blocking this (Apache HTTP server) program.
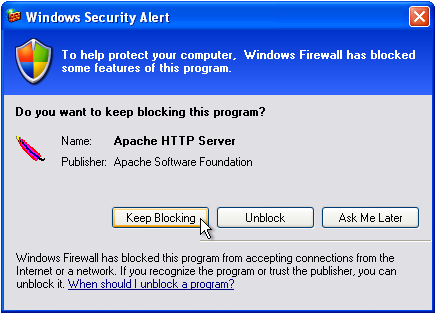
Since I don't want to make the web server available on the network I selected the Keep Blocking option. Note that you can always change this into Unblock later in case you decide to make the Apache HTTP server available on your network. After selecting a button in the Windows Security Alter dialogue window the window closes itself and the Apache HTTP Server 2.0 Installation Wizard reports that the Apache HTTP server has been installed successfully. Click the Finished button to close the HTTP server installation wizard.
In order to test your Apache web server installation, open a browser and enter http://localhost/
into the address bar (unless you used a different value then localhost in the Apache server information step).
The Test Page for Apache installation should be displayed into your browser.
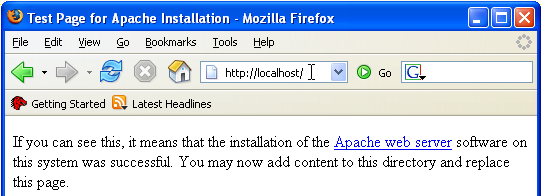
If you don't get the test page it might be that the Apache web server was not able to start for some reason, check the error.log file in the logs folder of the web server (see the next section).
It is important to understand some part of the Apache HTTP server folder structure, or where is what located. I won't describe each and every item, but just mention the important ones:
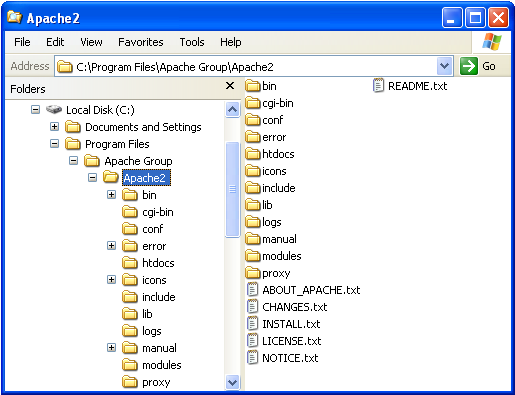
The bin folder contains amongst other files the server executable: Apache.exe and a program to control the Apache HTTP server when ran as service: ApacheMonitor.exe. Also contained in this folder are htpasswd.exe and htdigest.exe for making parts of your site(s) restricted.
The cgi-bin folder has one CGI program written in Perl, printenv.pl, which you can use to
test if your Perl installation is working in combination with the Apache HTTP server. If
you get a "500 Internal Server Error" when you enter http://localhost/cgi-bin/printenv.pl
in the address bar of your browser, you either have Perl not installed, or the configuration
of the web server is not right. You might want to check the error.log file in the logs folder in the
latter case.
This folder holds the configuration files used by the Apache web server. Of each file used by the
server there is a copy which has .default in its name, e.g. httpd.default.conf.
The access.conf and srm.conf files are empty
(except for comments) by default, and I recommend to not use those files for configuring the server.
The httpd.conf file has already been updated by the installation process. I list some of those
modified settings below, including a short description and the line number (which might differ
with your version).
Some of the other settings are omitted since they will be overridden by the name-based virtual hosting set up discussed below.
This folder contains the default HTML page you see when you visit http://localhost/ with your web browser. Don't start adding your HTML documents and related files to this folder, but read on.
This folder contains the Apache HTTP server documentation, available as http://localhost/manual/. Note that this folder shows up under the document root thanks to the AliasMatch directive in the httpd.conf server configuration file (line 491).
This folder contains (amongst others) the access.log and error.log files. If anything goes wrong, for example the notorious 500 Internal Server Error, make sure that you check the error.log file. With virtual hosting you can give each site its own log file (discussed below), so be sure to check the right file(s).
To make the configuration of virtual hosts as easy as possible I decided to store the configuration settings into a separate file instead of adding those settings to the Apache server configuration file httpd.conf.
Login to the computer with Administrator rights, and create an empty file named virtual-hosts.conf
inside the conf folder of the Apache HTTP server. The default location of this folder after
installation is C:\Program Files\Apache Group\Apache2\conf\.
Note: in an earlier version of this article I stored the virtual hosts file inside a folder with limted user rights which implied that this file has the same rights. Since this file is interpreted by the Apache web server this is a security risk if this limited user account is compromised.
For each website you want to have running locally you have to think up a domain name with great care. I use the same domain name as the real site with lc. added to the front (hence a subdomain) since I am very sure that this subdomain isn't used on the Internet in my case.
Add each domain name to the hosts file used by Windows XP, which is located in the C:\WINDOWS\system32\drivers\etc folder for a default installation. An example configuration might be (comments on top not included for brevity):
127.0.0.1   localhost

127.0.0.1   lc.johnbokma.com    # my personal site
127.0.0.1   lc.castleamber.com  # my company's site
Note that everything after the # character is regarded as a comment. You can use this to add useful comments. The IP address, 127.0.0.1, means "this computer" (localhost). If you want to use the web server in a local network, you have to use an IP address that can be contacted by other computers in the network. Also, you either have to modify all hosts files on each and every computer, or set up a name server.
Add the following line to the end of the httpd.conf file in the C:\Program Files\Apache Group\Apache2\conf folder in order to include the virtual-hosts.conf file and make it part of the configuration of the web server:
Include conf/virtual-hosts.conf
Since the ServerRoot in the default install is set to the folder that contains the conf
folder we can use the short relative notation as given above. Note: where filenames are specified, you
must use forward slashes instead of backslashes (e.g. conf/virtual-hosts.conf instead of
conf\virtual-hosts.conf).
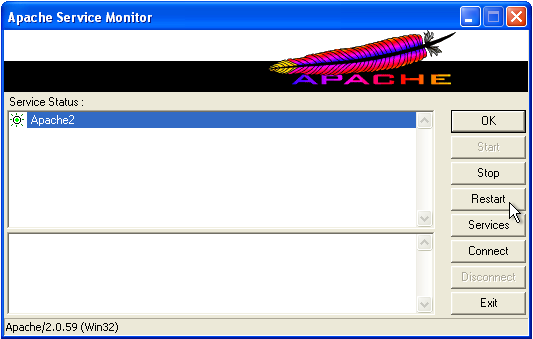
After changes have been made to the httpd.conf file and/or the virtual-hosts file, Apache has to be restarted. If you are logged in with Administrator rights the easiest way to do this is by using the Apache monitor which is started when you log in and available via the system tray. Click the right mouse (context menu) button on the red feather icon in the system tray and select the Open Apache Monitor menu entry. You can restart the Apache HTTP server with a single mouse click on the Restart button.
Note that during installation of the Apache web server a short cut to the Apache service monitor is created in the Startup folder of "All Users" (i.e. C:\Documents and Settings\All Users\Start Menu\Programs\Startup) which is quite useless. Users with limited access rights are not able to control the Apache service but will get the Apache monitor running in their system tray anyway. You might want to move the short cut to the Startup folder of a user with Administrator rights.
Another way to restart Apache is by entering in a command prompt window NET STOP APACHE2
followed by enter, followed by NET START APACHE2 to stop and start the Apache service:
NET STOP APACHE2
The Apache2 service is stopping.
The Apache2 service was stopped successfully.


NET START APACHE2
The Apache2 service is starting.
The Apache2 service was started successfully
Note that this only works if the command prompt has Administrator rights. As a limited user open the "Accessories" of the "All Programs" menu in the Start menu. Place the mouse pointer on top of the Command Prompt entry, press the right (context menu) mouse button, and select the "Run As..." option. In the "Run as" dialog window switch to "The following user" and select a user with Administrator rights from the drop down menu and enter the password for the selected user. In a similar manner a user with limited rights can run ApacheMonitor.exe located in C:\Program Files\Apache Group\Apache2\bin. However, most of the time switching to an account with Administrator rights is more convenient.
If starting the Apache HTTP server fails, for example:
NET START APACHE2
The Apache2 service is starting.
The Apache2 service could not be started.

A service specific error occurred: 1.

More help is available by typing NET HELPMSG 3547.
don't panic but read the next section on troubleshooting the Apache HTTP server.
If the Apache web server can't be started after a change to a configuration file, open a command prompt (you don't need Administrator rights), change the working directory to the Apache bin directory, and run apache.exe with the -t option:
cd "C:\Program Files\Apache Group\Apache2\bin"
C:\Program Files\Apache Group\Apache2\bin>apache -t
apache: could not open document config file C:/Program Files/Apache Group/Apache
2/conf/virtual-host.conf
In the above case I made (on purpose) a spelling mistake in the virtual-hosts.conf filename after the Include directive in httpd.conf.
Fix the problem reported, and run apache.exe again with the -t option. If the program reports that the syntax is ok:
C:\Program Files\Apache Group\Apache2\bin>apache -t
Syntax OK
try to start the Apache service again using NET START APACHE2 or
use the Apache service monitor (in both cases Administrator
rights are required).
Tip: you might want to study some of the other apache.exe command line options.
Use apache -h to get an overview. For example the option -S shows the virtual host settings,
see the next section.
After adding the Include directive to Apache's httpd.conf you can add and remove virtual hosts to the virtual-hosts.conf. Note that if you add new ones you have to update the hosts file as well.
Since the virtual-hosts.conf file is empty at this point, lets add the first name-based virtual host:
# Use name-based virtual hosting.
NameVirtualHost *:80

<VirtualHost *:80>

    ServerName lc.johnbokma.com
    DocumentRoot "C:/.../My Company/My Sites/johnbokma.com/site/web"

    CustomLog logs/lc.johnbokma.com.access.log combined
    ErrorLog logs/lc.johnbokma.com.error.log

</VirtualHost>
Note that I replaced a part of the DocumentRoot path with three dots (...) in order to keep the line short. Make sure that you use the full path in your virtual-hosts.conf file. Moreover, each backslash should be replaced with a forward slash. Also note that the DocumentRoot directory (web) doesn't end with a slash at all.
With the above set up both the error log and the access log are written by the web
server inside the logs folder, a sub folder of the folder defined by the ServerRoot directive.
For each virtual host you should use a unique name for each log file so you are able
to distinguish between them and find possible problems sooner. I decided to use the domain name as a prefix
for each type of log file. Also, for the access log I specified the combined log format.
This is the common format with two additional fields: the Referer ("previous page") and
User Agent (which browser was used to make the request).
The NameVirtualHost directive is only required once, so put it at the start of the virtual-hosts.conf file. Also note that the first VirtualHost entry is the default, meaning if you go to http://localhost/ you will see the index page of the first virtual host. You might want to set up a special first entry to being able to distinguish between http://localhost/ and the first "real" virtual host.
For each virtual host, copy the virtual host section (<VirtualHost *>..</VirtualHost>), change the domain name after the ServerName directive, and change the path for DocumentRoot and the filenames for ErrorLog and CustomLog.
With apache -S (capital S) on the command line (see previous section)
you can get a report of your virtual host settings.
If you visit one of your virtual sites with a browser you get a "403 Forbidden" error, unless you already put an index.html (or any other file the Apache web server can fall back upon) inside the document root of the virtual site, since the default for the Apache HTTP server is not to allow the listing of directory contents.
You might want to copy the following simple HTML into an index.html file for testing purposes:
<!DOCTYPE HTML PUBLIC "-//W3C//DTD HTML 4.01//EN"
   "http://www.w3.org/TR/html4/strict.dtd">
<html>
    <head>
        <title>lc.johnbokma.com</title>
        <meta http-equiv="Content-Type"
            content="text/html; charset=ISO-8859-1">
    </head>
<body>
    <h1>lc.johnbokma.com</h1>
    <p>
        The name-based virual host 'lc.johnbokma.com'
        is up and running.
    </p>
</body>
</html>
You might want to replace all 3 occurrences of lc.johnbokma.com with the host name of your virtual server, or something else.
Another option is to visit /manual/ of your local site, for example http://example.com/manual/. Since the default configuration of the Apache HTTP web server makes the manual available via an alias (see also end of this article).
Make sure to check the access and error logs of each virtual host. Are new lines added when requests are made by the browser? If you have no favicon.ico file in the document root you will see attempts of your browser to access it in the access log of the virtual host and a failure message in the corresponding error log.
The Apache web server comes default with three aliases defined, which also show up for each virtual host. Moreover, they can mask a directory in your document root if it has the same name.
You might want to comment out line 477-484 ( Alias /icons/ up until and including
</Directory>), line 491-505 (AliasMatch ^/manual... up until and including
</Directory>), and line 515-526 (ScriptAlias /cgi-bin/ up until and including
</Directory>).
I have plans to add two tutorials soon: "Installing PHP", and "Using CGI Perl scripts" so stay tuned. Also some links have to be added to this page, and some additional "troubleshooting" help.