
Tuesday, the 19th of Februari the Dell Vostro 200 Slim Tower I ordered without Windows tax arrived. Back then I had unpacked the brand new computer, and placed it on my desk, but besides opening it and have a look at the inside, I hadn't done anything else with it because I've been too busy with various projects including a small SEO project for a Dutch website. Anyway, for today I had planned to take several photos of the inside of the Dell Vostro 200 Slim Tower.
Before I opened up the computer, I first removed some protective plastic. One big piece stuck to the top (or left side when the Slim Tower is standing up), one surrounding the vents, and one covering it. Then I removed the blue sticky tape holding the doors of the 2 bays close (front) and the piece of protective plastic between. Finally I removed the big piece of plastic that was stuck to the bottom (right side when standing up), one surrounding the vents, and one covering it. The big pieces of protective plastic worried me a bit, and indeed, the case does have many thin scratches, which are very hard to see though. But Dell should, in my opinion, have selected a more scratch-resistant coating.
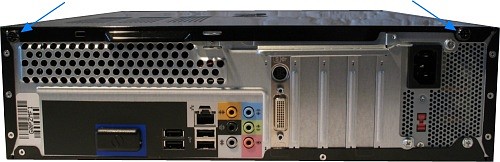
I had already opened the Vostro the day it arrived. At the back of the computer there are two thumb screws, which required a screwdriver to losen them up. Because I hadn't tighten them too much that day, today I was able to unscrew both thumb screws this time with my hand without much effort (see blue arrows in the above photo for the location of the two screws). And again I was reminded how similar the Vostro looks on the inside to the SGI Indy computers I own (but which are still stored in the Netherlands).
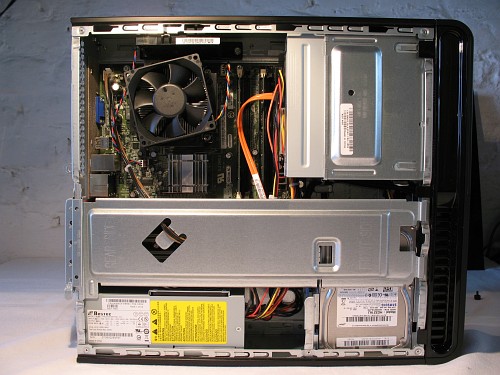
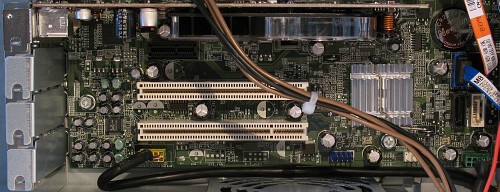
The power supply, visibile in the left bottom of the photo, is a Bestec TFX0250D5W (revision X3), and has a total maximum power of 250W. The hard disk drive, visible in the right bottom of the photo, is a Samsung HD321KJ Spinpoint T166 SATA (320 GB, 16MB DRAM buffer, 7200 rpm). I would have perferred a different brand hard disk drive, but Samsung it is.
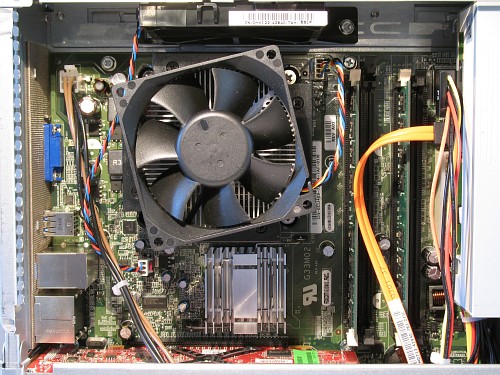
A huge cooling fan is placed, slightly rotated in order to connect it to the sides of the heatsink, on top of the Intel Core2 Duo CPU E6600 (2.40 GHz, 1066FSB, 4MB L2 cache), and a second fan is located nearby, in the top of the case when it's standing up. You can see the side of the second fan in the center top of the photo above.
To the right of the processor are 4 slots for memory, two are filled with 1GB DDR2 SDRAM 667MHz each, making the current total memory 2GB (dual channel). The micro ATX Socket 775 motherboard is a G33M02 made by FoxConn, which from what I've read is a modified version of the G33M. The chipset is Intel G33 Express "Bearlake" with I/O Controller Hub 9 (ICH9) used as "southbridge". In the above photo you can clearly see the graphics and memory controller hub (G33 GMCH, "northbridge"), covered by a heatsink.
Next I removed the metal strip that goes from the rear side to the front side. Before I could remove this strip I had first to rotate the PCI locking bar away from the case, and move a bundle of black and brown wires away from the "tongue" cut out in the metal strip (see second photo at the top of this page). After that it was a piece of cake to remove the metal strip and uncover PCI Express x16 slot, holding the ATI Radeon HD 2400 XT graphics card, and the empty PCI Express x1 slot, and the two empty PCI slots.
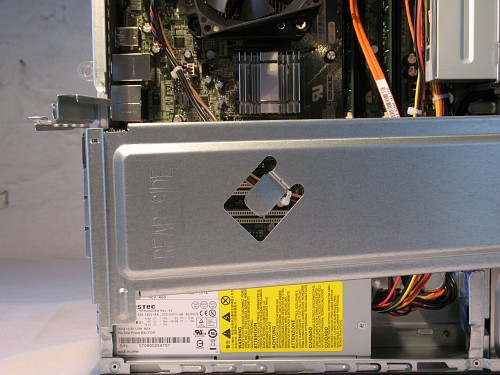
The first time I had opened the Vostro 200 Slim Line I noticed that the Samsung SATA hard disk drive was in the top position of the hard disk drive cage. Since I might want to add another hard disk drive in the near future I decided to see if I could move the hard disk drive to the bottom position.
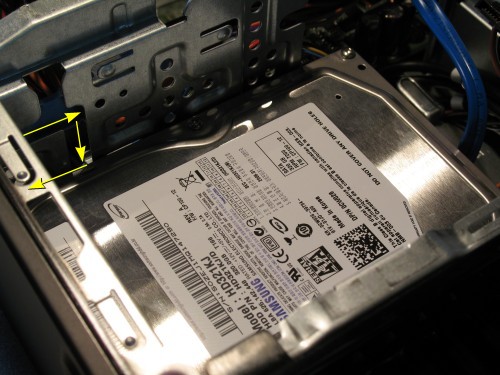
At first I was afraid that this was going to be very difficult because their was very little space. But after I had removed the power connection from the drive by pushing the blue lever towards the hard disk drive cage I could release the hard disk screw and slide the hard disk towards the optical drive cage, and even lift it out. In order to get it in the bottom position it's sufficient to move the disk towards the optical drive cage and carefully move it down, see the yellow arrows in the above photo.
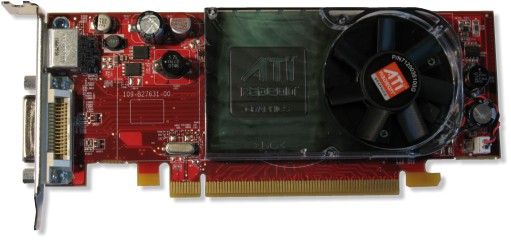
Next, I carefully removed the graphics card out of the PCI Express x16 slot so I could take a photo of it. The card is an ATI Radeon HD 2400 XT with 256 MB of memory and a RV610 GPU. I would have preferred a NVidia graphics card, but ATI it is. Moreover, I am sure that this graphics card is more than sufficient for most of the work I am going to do on the Dell Vostro 200 Slim Line, which is: work.
After I had taken a few photos I carefully put the card back in its slot, put the metal strip back and hooked the bundle of black and brown wires back into place, rotated the PCI locking bar back into place, slid the black cover back into place, and finally screwed both thumb screws back into place.