
If you prefer (or have to work) using an account with limited user rights and want to use CDex for ripping music CDs or Nero to burn DVDs you can make either program work by installing Nero BurnRights.
Download Nero BurnRights and install the program. A user Guide for Nero BurnRights is available in either English or German. Each language edition can be downloaded as either a CHM or PDF file. Below I give step-by-step instructions on how I configured and use Nero BurnRights.
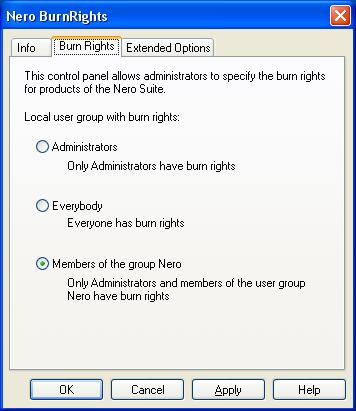
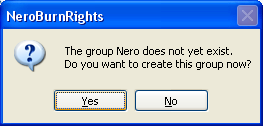
I set the Burn Rights to "Members of Group Nero". After I clicked the OK button the program showed a dialogue window with the following message: "The group Nero does not yet exist. Do you want to create this group now?". I clicked on the Yes button. A restart is required to complete the installation.
After the restart I opened the Control Panel via the Start Menu. Next I opened the Administrative tools. I selected the "Computer Management" entry. Since I was using a limited user account at that time, I selected the entry with the right mouse button (context menu) and clicked the "Run as..." option in the menu to start "Computer Management" with Administrator rights.
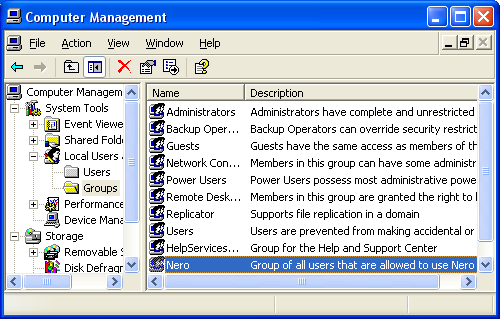
Select in the left pane of the Computer Management dialogue window the entry "Groups", a sub entry of "Local Users and Groups". The group "Nero" should show up in the right pane. Select this group with the right mouse button and click on the "Add to Group..." option in the context menu.
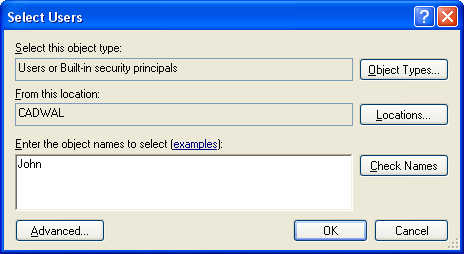
The Nero Properties dialogue window is opened. Click the Add... button to open the Select Users dialogue window. Enter the usernames of the users you want to have burn rights (and hence CDex ripping rights).
When you have entered all names, click on the OK button. The users should now show up as members of the Nero group in the Nero properties dialogue window. Click on the OK button of the Nero properties dialogue window, and close the Computer Management window.
Remember, if you do this with a limited user account and used "Run as..." like I did you have to log out your limited user account and log back in again order to propagate the addition to the Nero group to your account.