Getting started with the Perl version of tumblelog on Ubuntu 18.04 LTS
March 28, 2020
Earlier this week I was contacted by Paul N. Pace who had problems
installing the Perl version of tumblelog on his Mint 19 installation
which according to his email is based on Ubuntu 18.04 LTS. Because I am
sure there are more people interested in this I decided to write a how
to on the installation on Ubuntu 18.04 Bionic Beaver and how to get
started with tumblelog.
Installing Sass
Sass (Syntactically Awesome Style Sheets) is used to generate the style sheet (CSS) used by the blog. You can install the Ruby implementation of Sass on Ubuntu 18.04 as follows:
sudo apt install -y ruby-sass
When finished if you enter sass --version it should report:
Sass 3.4.23 (Selective Steve)
or a more recent version.
Installing the CommonMark library
The Perl version of tumblelog requires the CommonMark Perl module to
be installed. This module relies on a C library so we have to install
that one first. Since the most recent version of this library is
available as a git repository let's install git as follows:
sudo apt install -y git
Clone the CommonMark parsing and rendering library as follows:
git clone https://github.com/jgm/cmark.git
In order to build the library successfully cmake, g++, and
python are required, so we install those packages as follows:
apt install -y cmake g++ python
Change into the cmark directory using cd cmark and issue the
following commands:
make
make test
sudo make install
After this, when you issue the command cmark --version it should report
cmark 0.29.0 - CommonMark converter
(C) 2014-2016 John MacFarlane
or a more recent version.
Next, we make the shared library available to the system so the Perl build process in the next step can find it:
sudo ldconfig
Move out of the cmark directory and delete it as follows:
cd ..
rm -rf cmark
Installing the CommonMark Perl module
I installed the CommonMark library for Perl using cpanm, which can
be installed as follows:
sudo apt install -y cpanminus
Build and install the CommonMark Perl module as follows:
sudo cpanm CommonMark
Installing the JSON::XS Perl module
The Perl version of tumblelog requires the JSON::XS module to be
present. This module can be installed as follows:
sudo apt install -y libjson-xs-perl
Downloading tumblelog
The easiest way to download tumblelog is to use git clone:
git clone https://github.com/john-bokma/tumblelog
Generating the test pages
In this step the test pages are generated in order to verify that all the requirements have been met.
Change into the just created tumblelog directory:
cd tumblelog
First, create a directory to store the generated files:
mkdir htdocs
Next, generate the CSS file from one of the available styles. For
example october.scss:
sass --sourcemap=none -t compressed styles/october.scss htdocs/october.css
Examples of all available styles are stored in the screenshots directory.
Next, generate the blog as follows:
perl tumblelog.pl  --template-filename tumblelog.html --output-dir htdocs/ \
     --author 'Test' --name 'Test Blog' --description 'This is a test'    \
     --blog-url 'http://example.com/' --css october.css tumblelog.md
Make sure you press return immediately after each backslash. The command should report a list of files it has created.
The arguments to tumblelog.pl are as follows:
- --template-filename: the filename of the HTML template to use.
- --output-dir: where to save the generated files to.
- --author: the author of the blog.
- --description: a short description of the blog, used by the feeds.
- --blog-url: the web address of the blog.
- --css: the name of the CSS file generated by Sass.
- tumblelog.md: the name of the file with the blog contents.
You can use a Python one-liner to start a web server inside the
htdocs directory and see the generated files in a web browser as
follows:
cd htdocs
python3 -m http.server
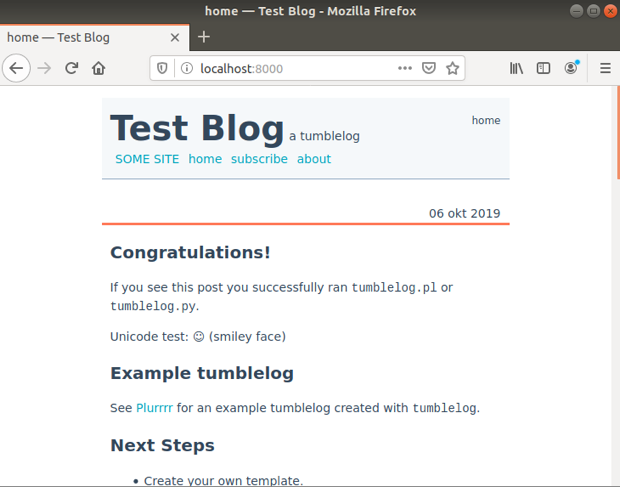
Now open the address http://localhost:8000/ in your web browser and
the index page of the test blog should show up. You can quit the
Python web server by pressing Ctrl+C inside the terminal.
Where to go from here
On my computer I have a separate directory for my blog
Plurrrr. I recommend to do the same and not
modify any of the files that belong to tumblelog directly. The
reason for this is that you can use:
git pull
to update to the latest version of tumblelog without causing any
conflicts. I recommend to issue this command like once a month or
so. If there is an update, please read the CHANGELOG.md file to
learn what has changed.
Change to a directory above the tumblelog directory and create a
new directory, named after your site:
cd ..
mkdir example.com
Create in this directory a directory to store the generated files, and copy the template file and the markdown file. For example:
cd example.com
mkdir htdocs
cp ../tumblelog/tumblelog.html example.html
cp ../tumblelog/tumblelog.md example.md
Modify the copied template file and the copied markdown file.
Next, use sass to generate a CSS file inside the newly created
htdocs directory, for example the style vector:
sass --sourcemap=none -t compressed ../tumblelog/styles/vector.scss \
     htdocs/vector.css
Next, generate your site as described above.
Happy blogging!