Testing tumblelog
This article assumes you have cloned tumblelog using git,
installed its prerequisites, and the current working directory is
tumblelog as described in Installation of the Python
version or
Installation of the Perl version.
In order to test tumblelog, first create a directory inside the
tumblelog directory to store the output the program generates, for
example named htdocs:
mkdir htdocs
Next, create a stylesheet for the test blog. The program comes with several predefined styles; sources for such stylesheet. You can see which are available with:
ls -1 styles
Note that both _fonts and _tumblelog.scss are files included by
all other style files and not a tumblelog style. The screenshots
directory has a screenshot per available style.
The styles are in a special format and have to be converted using the
sass program. For example to convert the style steel.scss to CSS
use:
sass --sourcemap=none -t compressed styles/steel.scss htdocs/steel.css
This creates a compressed stylesheet inside the htdocs directory.
To Tag or Not to Tag
Since version 5.0.0 tumblelog supports the manual tagging of blog posts (and
blog posts only; not the stand alone pages). This feature is enabled with the
--tags option. If you specify this option tagging is mandatory; each post must
have at least one tag.
Testing without Tags
You can generate an example blog without tags using the following command:
python3 tumblelog.py --template-filename tumblelog.html --output-dir htdocs/ \
        --author 'Test' --name 'Test Blog' --description 'This is a test'    \
        --blog-url http://localhost:8000/ --css steel.css tumblelog.md
Note that in the above a backslash means "continue on the next line",
and no character should follow it, so make sure to press return after
each \ character.
The arguments to tumblelog.py are as follows:
--template-filename: the filename of the HTML template to use.--output-dir: where to save the generated files to.--author: the author of the blog.--description: a short description of the blog, used by the feeds.--blog-url: the web address of the blog.--css: the name of the CSS file generated by Sass.tumblelog.md: the name of the file with the blog contents.
If you prefer to use the Perl version, the following gives the same result as the above Python version:
perl tumblelog.pl --template-filename tumblelog.html --output-dir htdocs/ \
     --author 'Test' --name 'Test Blog' --description 'This is a test'    \
     --blog-url http://localhost:8000/ --css steel.css tumblelog.md
The arguments are the same as for the Python version.
The files generated by this command are all written to the htdocs
directory or subdirectories thereof. If you use the example Markdown
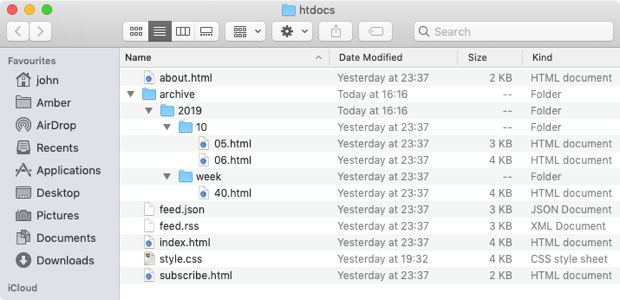
file tumblelog.md the directory layout will be as follows:

htdocs directory.
htdocs/
|-- about.html
|-- archive
|   `-- 2019
|       |-- 10
|       |   |-- 05.html
|       |   `-- 06.html
|       `-- week
|           `-- 40.html
|-- feed.json
|-- feed.rss
|-- index.html
|-- steel.css
`-- subscribe.html
The files contain the following information:
about.html: an example about page.feed.json: the blog feed in JSON format, see JSON feed.feed.rss: the blog feed in RSS format, see RSS 2.0 specification.index.html: the main page of the blogsteel.css: the stylesheet as generated by thesasscommand above.subscribe.html: an example subscribe page.05.html- example posts for the 5th of October, 2019.06.html- example post for the 6th of October, 2019.40.html- all posts for week 40 of 2019, in which fall the 5th and the 6th of October.
If you have Python 3 installed you can view the generated blog site inside a web browser as follows:
cd htdocs
python3 -m http.server
Go to http://localhost:8000/ to view the index page of the blog.
And if you have Python 2 installed you can serve the web pages using:
cd htdocs
python -m SimpleHTTPServer 8000
And view the generated blog using the same address as given above.
Testing with Tags
You can generate an example blog with tags using the following command:
python3 tumblelog.py --template-filename tumblelog-tags.html                 \
        --output-dir htdocs/                                                 \
        --author 'Test' --name 'Test Blog' --description 'This is a test'    \
        --tags                                                               \
        --blog-url http://localhost:8000/ --css steel.css tumblelog-tags.md
The arguments are the same as explained in the Testing without Tags
section, only the --tag option has been added and the names of the
two input files have been changed. This generates the same structure
as explained in the previous section with an additional tags
directory which contains the tag related files.
The --tags option comes with two additional related arguments:
--tags-label: the label to use on the tags overview page--tags-title: the title to use on the tags overview page
Finally, I generate my own blog, Plurrrr, using the following arguments:
perl tumblelog.pl --output-dir htdocs        \
    --template plurrrr.html --css soothe.css \
    --author 'John Bokma'                    \
    --description "John Bokma's tumblelog"   \
    --blog-url https://plurrrr.com/          \
    --date-format '%a %d %b %Y'              \
    --tags                                   \
    --name 'Plurrrr' --quiet plurrrr.md
Continue reading in Getting started with tumblelog.
Related
- tumblelog: a static microblog and microsite generator - Introduction