
If you edit with TextPad a lot, you probably want to keep back ups of the in between versions. Instead of making a zip at the end of the day, I recommend to use a version control system, like Subversion. Moreover, it's very easy to call it from Textpad itself, and hence you can make it part of the editing process itself.
Since TextPad runs in a Windows environment, I decided to use TortoiseSVN, a client for subversion implemented as a Windows shell extension, and hence comes with a graphical user interface (GUI). This article explains how to integrate TortoiseSVN into TextPad. I have also planned an article on getting started with Subversion, so either check back now and then, or subscribe to the RSS feed for this site.
In order to call an external program from within TextPad a "tool" has to be created. Tools are added to the, surprise, Tools menu, and to make life easier you can also associate a key combination to call the tool.
Definition for tools are made via the Preferences dialog window. Either press Ctrl+Q followed by P to open this window, or select the Preferences... entry in the Configure menu of TextPad.
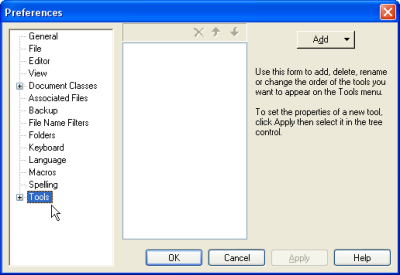
When the Tools entry is selected in the left part of the dialog window, the center part shows a list of Tools already defined, with an Add button to the right. You are now ready to define your first tool.
Although it may sound counterintuitive to start with commit, it's probably the tool you're going to use the most. Also, TortoiseProc.exe, the program we are going to use in each tool, is able to do the add and commit to the repository in one go.
Press the Add button, and in the drop down menu select "Program". Browse to the bin folder inside the installation folder of TortoiseSVN, which is on my system:
C:\Program Files\TortoiseSVN\binSelect the TortoiseProc program, and press the Open button. You should now see a new entry added to the list in the center of the Preferences dialog: TortoiseProc. Now put the mouse pointer on the already selected entry, and click the left mouse button once and wait. If you do it right, you now can edit the name. Change it into Commit.
Notice that the new tool you just created doesn't show up under the Tools entry on the left side of the Preferences Dialog yet. Press the Apply button, and it should appear.
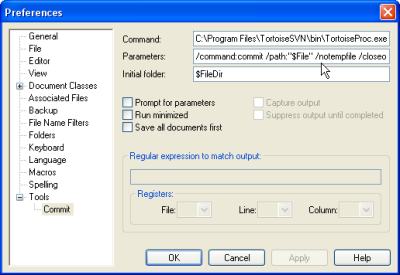
Select the Commit entry under the Tools entry (left side of Preferences Dialog) and change the Parameters field into the following:
/command:commit /path:"$File" /notempfile /closeonendNote the quotes around $File, those are needed. Also, because the $File variable is used in the Parameter field, TextPad saves the file before the tool is actually executed. Finally, the /notempfile is mandatory, as explained in "Appendix C: Automating TortoiseSVN" of the help file that comes with TortoiseSVN.
By following /closeonend by a : and a number you can override the Autoclose setting
(Tortoise SVN Settings, Look and Feel, Dialogs) of TortoiseSVN as follows:
/closeonend:0 don't close the dialog automatically/closeonend:1 auto close if no errors/closeonend:2 auto close if no conflicts/closeonend:3 auto close if no merges
For example, with this tool you might decide to use /closeonend:1 instead
of the default selected by /closeonend.
After you changed the Parameters field, and optionally changed the /closeonend,
press the OK button.
Important: when you commit a file, make a habit of entering a meaningful into the log message input field. This might sound like a lot of work, and with small edits even superfluous, but trust me on this, better safe now then sorry later. And make sure it's meaningful, not only at the moment itself, but also after months and months. Just "fixed some bugs" is as bad as nothing at all.
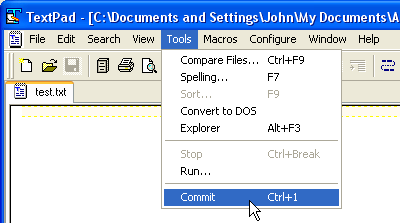
If you now open the Tools menu, the tool you just created should be visible, followed by a key combination, which is default Ctrl+1. At the end of this article I explain how to change the key combination, and other customizations you might want to do.
Once a file is in the repository, you can view the log of it. I recommend to create the Show Log tool for two reasons: first it makes it possible to view each message that has been entered in the commit step. Secondly, you can compare any revision with the current file in the editor.
Repeat the steps as given in the previous section, but use "Show Log" as the name of the tool, and use the following for "Parameters" field:
/command:log /path:"$File" /notempfileYou can compare the current file (working copy) against a previous revision by selecting the revision entry in the Log Messages window, pressing the right mouse button, and selecting the "Compare with working copy" entry in the context menu.
Now and then I want to see which changes I made to the file I am editing, compared to the last version committed (head revision). The Show Low tool, as described in the previous section, provides for a diff with any revision, including the head one.
However, to make life easier you might want to add the Diff tool with the following value of the "Parameters" field:
/command:diff /path:"$File" /notempfileEven though TextPad has excellent undo facilities, sometimes I want to fall back to the last revision I committed (head), which is called a revert to the head version.
Again, repeat the steps as given before, use "Revert" as the name of the tool, and use the following for the "Parameters" field:
/command:revert /path:"$File" /notempfileNote that with the Show Log tool you can fall back to any revision.
Default, the first tool you define can be activated by pressing Ctr+1, the second one by pressing Ctrl+2, etc. In case you want to change this, open the Preferences dialog of TextPad, and select the Keyboard option. Next, select the Tools category, and select the tool of which you want to customize the shortcut key.

Then, click in the "Press new shortcut" field and press the shortcut key you want to use. Remember that TextPad uses Ctrl+Q as an extra meta key, so I decided to assign Ctrl+Q, C to commit. Note that if a shortcut is already in use, TextPad reports this under the "Press new shortcut" field.
Important: make sure you press the Assign button in order to confirm the change. If you just press OK, nothing will be changed. Also, you might want to remove the default shortcut.
Note that you can organize the tools you created in the Tools menu. You can either move them up or down in order to group them. Also, you can insert menu separators for easy recognition of groups.
Select the Tools entry in the Preferences dialog window. Above the list of available tools you see three icons which are linked to the following actions: delete, move up, move down. A menu separator can be added by pressing the Add button and selecting the Menu Separator option. A separator, displayed as ----------- can also be moved up and down, and deleted.