
Today I finally decided to flash my router with a new firmware: Kamikaze version 7.09. Despite the promise on the OpenWRT website: "Last day in August - final release: OpenWrt Kamikaze 8.08 Release", no new release was available on the first day of September. Someone in the forum stated that "it's done when it's done". I can live with that, but why not mention this on the home page?
Anyway, back to the issue at hand: downloading and flashing a Linksys WRT54GL router. First I dug up my old router, a D-Link DI-604; given to me by my brother Marco when I moved to Mexico. I had never flashed a router before, and was aware of the small risk that I might end up with a non-working router, and no way to safely connect to the Internet. Hence why I decided to keep the DI-604 at hand.

After I had disconnected the WRT54GL, and tested the DI-604 - it worked without any problems - I browsed to the
Download page of the OpenWrt site. Since the serial number of the router started with CL7B I knew the router
was a version 1.1 model WRT54GL. Moreover, the sticker at the bottom just stated so. Hence I was sure
that Kamikaze would work on my router. Since I had read that the 2.6 kernel didn't support Wi-Fi (yet?) I
decided to download a firmware with the 2.4 kernel. So after a few mouseclicks I ended up in
/kamikaze/7.09/brcm-2.4/ - brcm because the WRT54GL uses a Broadcom - and downloaded
openwrt-wrt54g-2.4-squashfs.bin.
When Firefox reported the file as being downloaded I checked its integrity using the md5sum program. I highly recommend to do this as well if you're going to follow the steps in this blog post. The sum - actually a digest - reported by the program was identical to the one reported on the OpenWRT website, meaning that I could be quite sure that the file was not corrupted during download. Then it was time for quite a scary step: flashing the downloaded file. So I disconnected the UTP cable connected to my computer from the DI-604 and reconnected it to the WRT54GL. This was now the only UTP cable connected to the Linksys router.
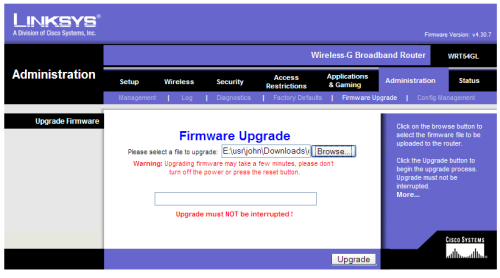
I had decided to use the web user interface method to upload/flash the firmware, because it sounded the easiest method to me. So I browsed to http://192.168.1.1/Upgrade.asp using Firefox and selected the file I had just downloaded from the OpenWrt website in the Linksys web user interface. After I had clicked the upgrade button and the rectangular area above "Upgrade must NOT be interrupted!" slowly started to fill with vertical bars, I decided to step away from the computer to avoid accidentally interrupting the flashing process.
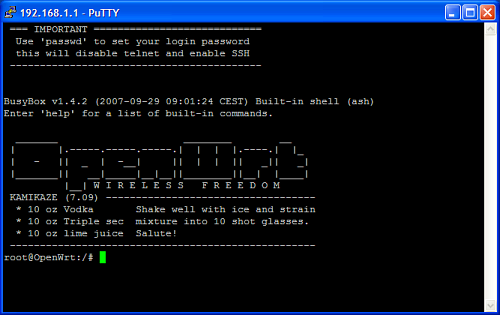
When I returned to the computer Firefox displayed a page which stated "Upgrade is successful". Next, I started PuTTY and created a session for the WRT54GL: IP address 192.168.1.1 and port 23 (telnet). I saved the session, and then opened it and was greeted by the Kamikaze 7.09 welcome screen.
After the excitement of having sucessfully flashed - instead of bricked - my router, I followed the installation instructions I had read, and typed the following commands:
nvram set boot_wait=on
nvram set boot_time=10
nvram commit && reboot
That last line is probably the most cryptic one. It means: write the changes to the non-volatile random-access memory for real and (&&) if that was successful, reboot the router. Without the commit, the two earlier settings would be lost after a reboot.
According to the aforementioned installation instructions, after this point the NVRAM is no longer used, and it is recommended to clean the NVRAM by downloading a script and executing it. Downloading a script: first I had to configure the WAN port for Internet access. Or so I thought, it turned out that the default is DHCP (for cable internet), and hence didn't need to configure anything as the following command shows:
uci show network.wan
network.wan=interface
network.wan.ifname=eth0.1
network.wan.proto=dhcp
The uci (unified configuration interface) program makes viewing and altering configuration settings very easy. The settings are stored in configuration files in /etc/config.
Note: I recommend to use the passwd command to set a strong password and connect using SSH before you reconnect the UTP cable to the WAN port. I am sure that I am overcautious in this regard, but now is as good a time as any to set your router's password to something secure.
After I had connected the UTP cable coming from my cable modem to the WAN port of the WRT54GL I changed to the temporary directory, downloaded the NVRAM clean script, and executed it using the following instructions:
cd /tmp
wget http://downloads.openwrt.org/people/kaloz/nvram-clean.sh
chmod a+x nvram-clean.sh
./nvram-clean.sh
The latter reported:
Before: size: 10758 bytes (22010 left)
After: size: 3279 bytes (29489 left)
After I had commited the changes - don't forget to do this - using
nvram commit I deleted the NVRAM clean script using rm nvram-clean.sh.
The final step I had planned for today was making Wi-Fi work with my PDA, a Dell Axim X51v. The highest security setting supported by this pocket PC while running Windows Mobile 5 is WPA-PSK (Wi-Fi Protected Access, pre-shared key mode) using TKIP (Temporal Key Integrity Protocol).
After I had done some reading on how to set up Wi-Fi it was not entirely clear how to use uci
to set things up: most examples used the NVRAM (the old way), and I was not sure if
using encryption psk implied TKIP.
I decided to follow the instructions given in Configure WiFi encryption.
However, when I tried to install nas I got the following message:
Package nas (4.80.53.0-1) installed in root is up to date.
Nothing to be done
Done.
So it seems that nas comes out of the box with Kamikaze 7.09.
Next I followed the instructions on configuring WPA (PSK) encryption using uci. However
for some reason my Axim was not able to connect to the router. After a nice cup of tea I decided to
give it one more try, and bingo: my PDA connected to the WRT54GL, and I was able to browse the Internet.
Looking back through the lines of the saved PuTTY session, the following instructions did the trick for me:
uci set wireless.wl0.disabled=0
uci set wireless.cfg2.encryption=psk
uci set wireless.cfg2.key=SomeLongPassPhrase
uci set wireless.cfg2.ssid=YourNetworkName
uci commit wireless && wifi
One thing I noticed though: each time I disabled the Wi-Fi on the Axim pocket PC, a line showed up in PuTTY - still connected to the WRT54GL:
wl0: Invalid argument
I used Google to find more information on this. From what I've read, each time this line is reported, Kamikaze
also resets the Wi-Fi stack, and hence breaks off all connections you might have via Wi-Fi on other computers (oops).
The good news is that this seems to have been fixed in recent builds of Kamikaze. However, after I rebooted the router,
and reconnected to it using PuTTY I was no longer able to reproduce the wl0: Invalid argument message.